I could sum up this review with those three words, but that's hardly enough detail, no?
The NETGEAR PR2000 is a unique, specialized product but manages to be very easy to set up and use. Its footprint is incredibly small -- only about 3.3 inches square -- and can be powered either by plugging directly into the wall or via USB. This makes it ultra-convenient. Plus, it's actually three products in one:
Range extender
Wi-Fi Bridge for Ethernet devices
Mobile Wi-Fi router and hotspot
The PR2000 also allows for USB file sharing over the Wi-Fi network! So, it's becoming clear that the PR2000 solves a variety of problems encountered in the home and while travelling. Let's dive deeper into what it can do.
NETGEAR PR2000 (Trek) As a Range Extender
Range extenders are purpose built devices that "hook on" to an existing Wi-Fi connection as provided by a wireless router and amplify that signal to extend coverage beyond the range of that router. For example, let's say a dead zone in coverage exists on your porch. A range extender could be placed halfway between the porch area and the location of the main router to bring a useable connection while sipping your beer and grilling brats.
The Trek is set up to function as a range extender, and in fact can be specifically optimized to do so. Following the incredibly simple setup instructions -- which involve not much more than turning on the Trek -- selecting a wireless network to connect to, and checking a box to "Extend my current wireless router's range," the Trek will create its own hotspot for wireless devices to connect to in the area it's designated to cover. It's that easy!
NETGEAR PR2000 (Trek) As a Wi-Fi to Ethernet Bridge
In some cases users will want to provide Internet coverage to a device that does not support a Wi-Fi connection, such as an XBOX 360 (which does not natively provide wireless) or other set-top box. This can also be useful in a hotel room that only provides one Ethernet connection, or if that connection is inconvenient for the device to reach.
Using almost exactly the same setup as range extender mode, users can connect an Ethernet device to the LAN port of the Trek, extending a wired Internet connection where one did not previously exist. Neato!
NETGEAR PR2000 (Trek) As a Travel Wi-Fi Router
I feel this is the coolest and most useful application for the Trek. It's basically a pocket-sized wireless router; the explanation couldn't get any more straightforward. The same setup steps as before are followed, except that the user won't check the "extend" option, and a public hotspot is used for the connection.
The benefits of this are many:
Users are protected against a variety of security vulnerabilities of public hotspots due to the built-in firewall of the Trek.
It provides an easy way to get around crappy hotel Wi-Fi. If you've ever tried to actually get a decent connection on hotel Wi-Fi, you know what I'm getting at. Connect the Trek to the Ethernet connection instead and make your own Wi-Fi hotspot -- it's not only safer, but faster, and you can connect all your wireless devices easily.
Have a mobile 4G hotspot, or a mobile phone that supports this? Instead of giving out your private password, simply connect your Trek to your mobile hotspot, and allow your friends or colleagues to connect to it instead.
To boot, the PR2000 sports a USB connection that can be used to share files via USB to those who are connected, or even a USB printer. A nice bonus is that the USB port can also be used, when plugged into an outlet, to charge a cellphone or mobile device.
It's also prudent to mention that the PR2000 can function as an in-home router, too. It probably isn't robust enough for power users to utilize as their main connection, but it would do the job nicely for small apartments, college dorms, or those with simple routing needs without a lot of devices to connect.
So, how good is the PR2000?
All these features are indeed pretty sweet, but how does it work? In short -- great.
To start off, the Trek was a snap to get running. It lacks the extended features and customizability of beefier routers, which is a trade off, as this simplifies setup. I literally had it running within a few minutes, which is cliche but true. It did take a short whilefor it to establish a connection with my R7000, but afterwards, it functioned all day as my main connection without a hitch.
The only negative point I found with the PR2000 is that, when used as a travel router, it did decrease throughput. While connected to the PR2000 (which was using the Wi-Fi connection from my R7000) I was able to achieve speeds of about 11 Mbps.
Connected directly to the router, I consistently achieved around 15 Mbps.
I struggle with even calling this a negative, as it's pretty much a given that a range extender or a travel router such as this would suffer some speed loss, but it's worth being aware of. On even a halfway decent connection, it won't ever be an issue for most users.
Conclusions
Based on my experience, the PR2000 is an all-around win, and a must have for those who travel. Not only is it a breeze to get working, it's stable and consistent and can function as three different products, depending on the need. Add that with some added "bonuses" like the USB connection for file sharing, printing, and charging mobile devices, a small form factor, and a crazy attractive price on Amazon right now! I can't recommend it enough. I know it's earned a permanent place in my laptop bag.
Hopefully you will never have to refer to this tutorial, but for people who like to play with their routers, it sometimes happens -- you accidentally "brick" your router. This tutorial enables you to recover your router by flashing stock firmware back again using serial console and windows PC. Developers who want to get access to their router by using a serial console may also refer to this tutorial.
Prerequisites:-
Target router with serial connection pins on board.
One Ethernet straight cable.
An appropriate screwdriver, which is used to open the case of the router.
A USB-TTL cable or compatible serial cable.
A windows machine installed with following software, - TFTP Client. - Serial Client (preferably Putty. Which can be downloaded here). - Appropriate driver software for your USB serial cable.
Supported Netgear Router Models:-
This tutorial may be referenced for following router models.
This is very first step in the process. Connect USB end of the serial cable to your windows PC and other end to the serial pins on the board. Visit appropriate link below toget details of the serial pin connection for your router model.
Configure and run serial client on your windows PC : -
In this step you have to configure and launch serial client in your PC. If you are using putty following steps will help you.
Identify exact COM port to which your cable is connected:-
Open device manager in your PC [Windows XP: Control Panel => System => Hardware => Device Manager, Windows 7: Control Panel => Device Manager], and click on the "Ports" item, it will show the COM port to which serial cable is connected as shown in Figure 1. In this example, the port that USB to serial connector uses is COM3.
Figure 1: Identify COM port
If you don't see that, re-insert USB end of the cable into your PC and the Device Manager should refresh. Still COM port is not visible?? Verify if you have installed appropriate serial to USB driver in your PC. Once you have downloaded the driver, reboot the PC and re-insert USB end of the cable into PC and check if the COM port is listed or not.
Configure and Launch PuTTY:-
You'll have to select the Serial radio button, enter the port (whatever port was revealed in previous step) in “Serial Line” section and 115200 in “Speed” section as shown in Figure 2.
Figure 2 : Configure putty (1)
Then, you need to go into the serial settings (Serial on the left menu) and make sure of the following (as shown in Figure 3):
Data bits is set to 8
Stop bits is set to 1
Parity is set to none
Flow control is set to none
Figure 3 : Configure putty (2)
Now click "Open" to launch the serial console of your router. At this stage you will get a blank screen.
Change network configuration of your PC:
Connect your PC to the LAN port of the router with a straight cable.
Go to Control Panel => Your Internet Connection => TCP/IP => Properties and change your IP address as shown in Figure 4. Note: It is assumed that the router's default IP is 192.168.1.1
Figure 4: Changing network configuration
Reflash stock firmware to your router:
Press “Ctrl” & “c” key simultaneously with the PuTTY window active and power on your router. It will cancel the normal booting of the router and enter into its boot prompt.
In boot prompt, enter “tftpd” command to go into “TFTP Server mode”. If the TFTP server successfully started, you will get a message "Reading::" as shown in Figure 5.
Figure 5: Running tftp server in router boot prompt
At this step you should be able to ping 192.168.1.1 (router's default IP) from your PC.
Go into the directory containing the firmware file in your PC. Upload the firmware using following command.
tftp -i 192.168.1.1 put <Firmware Filename>
After the firmware is transmitted successfully, the router will start flashing it and reboot the unit automatically. You will get messages similar to Figure 6.
Figure 6: Firmware transferred successfully
You will be able to follow the full booting process in your serial console. Allow this process to finish, it will take several minutes, and wait until it is COMPLETELY finished and the command prompt comes.
When it's done, you can try accessing your router's GUI via http://192.168.1.1
Using serial console setup users can get access to the serial console of their router. Serial console setup finds its most important use in debricking a router. Moreover, developers may use it to extract useful debug information from their routers.
This short tutorial explains how to setup serial console for Netgear R7000.
Identify location of Serial pins on your router:
First open the case of your router. You should be able to find pins for serial communications at the location indicated in Figure1(a).
Figure1(a): Serial pin location on your router
Note:- Some R7000 may not come with pins for serial communications. In such cases, you will have to attach the pins on your own. Go to the location as indicated in Figure1(a), where you will find a connection with the name J252 as shown in Figure 1(b). Solder the pins here carefully.
Figure 1(b): Serial pin location on your router
Identify important pins on router for serial communication:
Important pins on the router for serial communication are identified in Figure 2.
Figure 2: Important pins on the router for serial communication
Identify important pins in USB-TTL cable:
Important pins in the USB-TTL cable are indicated in Figure 3.
Figure 3: Important pins in USB-TTL cable
How to connect USB-TTL cable to the pins on the router for serial communication:
The connection between USB-TTL cable and pins on the router for serial communication is explained in Figure 4.
Figure 4: Connection between USB-TTL cable and pins for serial communication
Physical setup of your serial console ends here.
Verification of the setup:
To verify your setup, start serial client on your PC with proper parameters and then power on your router. As soon as you do this, you will be able to see debug information from the router on your screen. If you do not see anything, check that all the connections have been made properly and if in doubt, reattach the cables. Verify that the Serial Client has the proper parameters for the connection.
Using serial console setup users can get access to the serial console of their router. Serial console setup finds its most important use in debricking a router. Moreover, developers may use it to extract useful debug information from their routers.
This short tutorial explains how to setup serial console for Netgear WNDR4500v1.
Identify location of Serial pins on your router:
First open the case of your router. You should be able to find pins for serial communications at the location indicated in Figure1(a).
Figure1(a): Serial pin location on your router
Note:- Some WNDR4500v1 may not come with pins for serial communications. In such cases, you will have to attach the pins on your own. Go to the location as indicated in Figure1(a), where you will find a connection with the name J252 as shown in Figure 1(b). Solder the pins here carefully.
Figure1(b): Serial pin location on your router
Identify important pins on router for serial communication:
Important pins on the router for serial communication are identified in Figure 2.
Figure 2: Important pins on the router for serial communication
Identify important pins in USB-TTL cable:
Important pins in the USB-TTL cable are indicated in Figure 3.
Figure 3: Important pins in USB-TTL cable
How to connect USB-TTL cable to the pins on the router for serial communication:
The connection between USB-TTL cable and pins on the router for serial communication is explained in Figure 4.
Figure 4: Connection between USB-TTL cable and pins for serial communication
Physical setup of your serial console ends here.
Verification of the setup:
To verify your setup, start serial client on your PC with proper parameters and then power on your router. As soon as you do this, you will be able to see debug information from the router on your screen. If you do not see anything, check that all the connections have been made properly and if in doubt, reattach the cables. Verify that the Serial Client has the proper parameters for the connection.
Using serial console setup users can get access to the serial console of their router. Serial console setup finds its most important use in debricking a router. Moreover, developers may use it to extract useful debug information from their routers.
This short tutorial explains how to setup serial console for Netgear WNDR4500v2.
Identify location of Serial pins on your router:
First open the case of your router. You should be able to find pins for serial communications at the location indicated in Figure1(a).
Figure1(a): Serial pin location on your router
Note:- Some WNDR4500v2 may not come with pins for serial communications. In such cases, you will have to attach the pins on your own. Go to the location as indicated in Figure1(a), where you will find a connection with the name J252 as shown in Figure 1(b). Solder the pins here carefully.
Figure1(b): Serial pin location on your router
Identify important pins on router for serial communication:
Important pins on the router for serial communication are identified in Figure 2.
Figure 2: Important pins on the router for serial communication
Identify important pins in USB-TTL cable:
Important pins in the USB-TTL cable are indicated in Figure 3.
Figure 3: Important pins in USB-TTL cable
How to connect USB-TTL cable to the pins on the router for serial communication:
The connection between USB-TTL cable and pins on the router for serial communication is explained in Figure 4.
Figure 4: Connection between USB-TTL cable and pins for serial communication
Physical setup of your serial console ends here.
Verification of the setup:
To verify your setup, start serial client on your PC with proper parameters and then power on your router. As soon as you do this, you will be able to see debug information from the router on your screen. If you do not see anything, check that all the connections have been made properly and if in doubt, reattach the cables. Verify that the Serial Client has the proper parameters for the connection.
The EX6200 is naturally a Wifi Range Extender -- now, it gets a special upgrade using DD-WRT open source firmware. DD-WRT will transform this Range Extender into a full featured Wifi Router.
By default, the EX6200 has 5 LAN ports and no WAN port. DD-WRT allows you to use one of the LAN ports as a WAN port + 4 LAN ports. Since there are differences in features, I'm going to explain a few of the changes when using it with DD-WRT.
In the picture below you can see that once you have flashed DD-WRT, you will have one WAN port, which is port 5 on the router.
The LED with label "Connected" will show WAN status, once it lights up you are connected to WAN either through a cable connection or wifi connection, e.g. Client Bridge. The wifi lights will only display if the radio is online or offline.
NETGEAR logo is used as diag light indicating DD-WRT diag events, e.g. if you press Save or Apply in the web, this light will confirm this action. The WPS button on the back is being used as radio on off switch. This is useful if you want to quickly turn on/off the radios, e.g. you have defined a schedule to turn off the radio at certain times and it is currently turned off you can quickly turn the radios on in order to have wireless access.
The reason why I think this hardware is interesting to use as a wireless router with DD-WRT are the following:
For the price, you will get a router with very good range, most wireless routers in this class only come with internal antennae
Good usb storage performance as it features a arm dual core cpu (2x800Mhz)
The unit is smaller than other routers in this class
It looks damn good :-)
What is not so good about this unit:
It has limited flash size and therefore we cannot add all features
Features:
WAN Support Static/DHCP/PPPOE/PPPOE Dual/PPTP/L2TP/Mobile Broadband 3G/4G
Announcing the new R8000 AC3200 Nighthawk X6 Tri-Band WiFi Router! Connecting the Internet to Everything
There's never been WiFi like it. The Nighthawk X6 AC3200 Router with breakthrough Tri-Band WiFi technology was built to connect to each and every device in your home??automatically and simultaneously.
Laptops, tablets, phones, TVs, game consoles, music streamers, cameras ?? if it??s WiFi enabled, it??s X6 accelerated.
With a massive combined wireless speed of up to 3.2Gbps, 3 WiFi bands and Smart Connect intelligence, every device is assigned the fastest WiFi connection possible and optimized for maximum speed.
Multiply your WiFi Nighthawk X6 takes your WiFi experience to another level with Tri-Band WiFi and 6 high-performance antennas.
Check out the Video!
More WiFi for More Devices
See the eye-opening, multiple-device-connecting prowess of the Nighthawk X6??with speeds up to 3.2Gbps and a 1 GHz dual core processor with 3 offload processors.
SAN JOSE, Calif. — July 14, 2014— NETGEAR®, Inc. (NASDAQ: NTGR) (www.netgear.com), a global networking company that delivers innovative products to businesses, consumers and service providers, today announced ReadyRECOVER™ (www.netgear.com/readyrecover), a new addition to their innovative ReadyDATA™ unified storage (NAS/SAN) platform. ReadyRECOVER is a backup appliance built to run exclusively with the ReadyDATA family of storage appliances. With ReadyRECOVER, small and medium-sized businesses (SMBs) are able to create full backups of servers, desktops and laptops every 15 minutes that can be independently used to quickly and reliably restore files, folders, databases or systems to any platform, physical or virtual. For the first time, businesses can confidently back up their data forever, without ever needing inefficient and time-consuming periodic full system backups.
NETGEAR is the first technology provider to enable incremental backups as full restore points delivering extremely simple recovery point management. ReadyRECOVER integration of the ReadyDATA storage appliance with award-winning ShadowProtect® backup and disaster recovery software from StorageCraft® Technology Corporation (www.storagecraft.com) results in each incremental snapshot functioning as a full recovery point, but consuming a minimal amount of storage space. In addition, each snapshot captures the entire system, the Microsoft Windows® OS, and all settings and data for a rapid full system recovery.
“ReadyRECOVER is a complete hardware and software solution in a single cost-effective backup appliance, relieving businesses of the burden of assembling their own solution,” said John McHugh, general manager and senior vice president of the NETGEAR Commercial Business Unit. “By marrying the enterprise-class features of ReadyDATA with StorageCraft’s best-in-class ShadowProtect software, we offer a solution that enables easy data restoration without a long and complicated process, while suiting the budgetary and usage needs of SMBs.”
ReadyRECOVER creates synthetic full backups in a VHDX format, ready to quickly recover into a virtual or physical machine. For both server-to-NAS backup and PC-to-NAS backup, ReadyRECOVER backups require no file conversion, and can independently be used to quickly and reliably restore files, folders, databases or Windows-based systems to any platform.
“We’re excited to team with NETGEAR in the development of ReadyRECOVER, leveraging our ShadowProtect backup and recovery software,” said Curt James, StorageCraft’s vice president of marketing and business development. “NETGEAR and StorageCraft have co-engineered an extremely innovative new backup and disaster recovery appliance for SMBs that maximizes business continuity should disaster occur.”
ReadyRECOVER provides companies with enterprise-class backup at an affordable price, complete with:
Protection for Windows servers, Virtual Machines (e.g., Citrix, Microsoft Hyper-V®, VMware, etc.), and PCs, both onsite and offsite
Simple setup and management
No incremental restores
Hardware-independent restoration to any hardware or virtualization platform
Zero-delay, WAN-optimized replication
Hardware compression and per-job deduplication for storage efficiency without performance overhead
An industry-leading five-year warranty for ReadyDATA, the hardware platform for ReadyRECOVER
“My clients are small businesses, who struggle to replicate backup data to an offsite location because of the limited bandwidth in their offices,” said Mark Dutton, the owner of Datamerge (www.datamerge.com.au), a provider of unique, customer-focused Information Technology and telecommunications solutions. “The WAN-optimized replication enabled by NETGEAR ReadyRECOVER addresses this problem and makes their backup and recovery processes painless and automatic. I recommend ReadyRECOVER as an integrated solution that is easy to install and maintain.”
Pricing and Availability
NETGEAR ReadyRECOVER is available now through authorized NETGEAR PowerSHIFT® partners (http://powershift.netgear.com/) and other reseller channels. As a software solution that runs exclusively on NETGEAR ReadyDATA storage hardware, ReadyRECOVER is licensed per machine, with protection for virtual servers starting at $369.99, for physical servers starting at $979, and PC protection for $94.99 in the United States. Customers will enjoy 5-Year Limited Hardware Warranty along with 24x7 Lifetime Technical Support and 5-Year Next Business Day part replacement.*
NETGEAR (NASDAQ: NTGR) is a global networking company that delivers innovative products to consumers, businesses and service providers. For consumers, the company makes high performance, dependable and easy to use home networking, storage and digital media products to connect people with the Internet and their content and devices. For businesses, NETGEAR provides networking, storage and security solutions without the cost and complexity of big IT. The company also supplies top service providers with retail-proven, mobile broadband solutions for their customers on the go. NETGEAR products are built on a variety of proven technologies such as wireless, Ethernet and Powerline, with a focus on reliability and ease-of-use. NETGEAR products are sold in approximately 49,000 retail locations around the globe, and through approximately 39,000 value-added resellers. The company's headquarters are in San Jose, Calif., with additional offices in over 25 countries. NETGEAR is an ENERGY STAR® partner. More information is available atwww.NETGEAR.com or by calling (408) 907-8000. Connect with NETGEAR at twitter.com/NETGEAR and www.facebook.com/NETGEAR.
About StorageCraft Technology Corporation
StorageCraft provides best-in-class backup, disaster recovery, system migration, data protection, and cloud services solutions for servers, desktops and laptops. StorageCraft delivers software and services solutions that enable users to maintain business continuity during times of disaster, computer outages, or other unforeseen events by reducing downtime, improving security and stability for systems and data. For more information, visit www.storagecraft.com.
StorageCraft and ShadowProtect are registered trademarks of StorageCraft Technology Corporation.
* Lifetime Technical Support is provided via free phone support for first 90 days, and via free online chat thereafter. Next Business Day Shipping may not be available in all localities worldwide. Customer should consult their local NETGEAR representative for applicable support services. For more information, see www.netgear.com/business/documents/prosafe-lifetime-warranty/default.aspx.
Safe Harbor Statement under the Private Securities Litigation Reform Act of 1995 for NETGEAR, Inc.: This press release contains forward-looking statements within the meaning of the U.S. Private Securities Litigation Reform Act of 1995. Specifically, statements concerning NETGEAR's business and the expected performance characteristics, specifications, reliability, market acceptance, market growth, specific uses, user feedback and market position of NETGEAR's products and technology are forward-looking statements within the meaning of the Safe Harbor. These statements are based on management's current expectations and are subject to certain risks and uncertainties, including, without limitation, the following: the actual price, performance and ease of use of NETGEAR's products may not meet the price, performance and ease of use requirements of customers; product performance may be adversely affected by real world operating conditions; failure of products may under certain circumstances cause permanent loss of end user data; new viruses or Internet threats may develop that challenge the effectiveness of security features in NETGEAR's products; the ability of NETGEAR to market and sell its products and technology; the impact and pricing of competing products; and the introduction of alternative technological solutions. Further information on potential risk factors that could affect NETGEAR and its business are detailed in the Company's periodic filings with the Securities and Exchange Commission. NETGEAR undertakes no obligation to release publicly any revisions to any forward-looking statements contained herein to reflect events or circumstances after the date hereof or to reflect the occurrence of unanticipated events.
Using serial console setup users can get access to the serial console of their router. Serial console setup finds its most important use in debricking a router. Moreover, developers may use it to extract useful debug information from their routers.
This short tutorial explains how to setup serial console for Netgear R8000.
Identify location of Serial pins on your router:
First open the case of your router. You should be able to find pins for serial communications at the location indicated in Figure1(a).
Figure1(a): Serial pin location on your router
Note:- Some R8000 router may not come with pins for serial communications. In such cases, you will have to attach the pins on your own. Go to the location as indicated in Figure1(a), where you will find a connection with the name J252 as shown in Figure 1(b). Solder the pins here carefully.
Figure1(b): Serial pin location on your router
Identify important pins on router for serial communication:
Important pins on the router for serial communication are identified in Figure 2.
Figure 2: Important pins on the router for serial communication
Identify important pins in USB-TTL cable:
Important pins in the USB-TTL cable are indicated in Figure 3.
Figure 3: Important pins in USB-TTL cable
How to connect USB-TTL cable to the pins on the router for serial communication:
The connection between USB-TTL cable and pins on the router for serial communication is explained in Figure 4.
Figure 4: Connection between USB-TTL cable and pins for serial communication
Physical setup of your serial console ends here.
Verification of the setup:
To verify your setup, start serial client on your PC with proper parameters and then power on your router. As soon as you do this, you will be able to see debug information from the router on your screen. If you do not see anything, check that all the connections have been made properly and if in doubt, reattach the cables. Verify that the Serial Client has the proper parameters for the connection.
This article describes the steps required for firmware upgrade in Netgear R8000. Here I use OEM firmware downloaded from the NETGEAR support site and DD-WRT firmware downloaded from here.
Step1:
Log in to the router web interface i.e. 192.168.1.1 and navigate to the Advanced -> Administration ->Backup Settings as shown in figure 1.
Figure 1
Step2:
Click the “Erase” button under “Revert to factory default settings” section as shown in figure 2.
Figure 2
Step 3:
Click the “Yes” button as shown in figure 3.
Figure 3
The router will reboot and you will be able to see a page same as figure 4. Wait for the reboot process to complete.
Figure 4
Step 4:
Log in to the router web interface i.e. 192.168.1.1 and navigate to the Advanced ->Administration->Router Update as shown in figure 5.
Figure 5
Step 5:
Click “Browse”, select the path for the DD-WRT firmware that you downloaded and click on the “Upload” button as shown in the figure 6.
Figure 6
Step 6:
Then click on the “OK” button as shown in figure 7.
Figure 7
The router will reboot and you will be able to see a page same as figure 8. Wait for the reboot process to complete.
Figure 8
Step 7:
It is always recommended to reset the router to factory defaults after successful firmware upgrade. This can be done by pressing the reset button for say 30secs as shown in figure 9. You will need to use something pointed to press the reset button, I use a pen for the same.
Figure 9
Step 8:
After reset, you will be logged on to the DD-WRT web page and asked to enter a new username and password as shown in figure 10.
Figure 10
Step 9:
Enter the username and password for the same. (Default username = root and password = admin for DD-WRT) and then click on the “Change Password” button as shown in figure 11. It is recommended to clear the cache of your web browser before using it.
Figure 11
Step 10:
Then you can see the status page of your router and the firmware version as shown in figure 12.
I've been a long time fan of NETGEAR routers, and with the R8000, they've really upped their game. There's a lot of hype about this particular router; many tout it as one of the best, if not the best on the market... and it certainly looks the part. However, with use by an average household, is it really worth it? Does it measure up?
Unboxing the NETGEAR R8000
I won't bore you with too many details here -- unboxings are cliche, no? I do really dig them, though, so here's some pics of what it's like to open one up. The packaging is top notch and very blingy, and this router really has a distinctive look.
Gold, shiny packaging.
The router of the hour.
Anatomy of the NETGEAR R8000
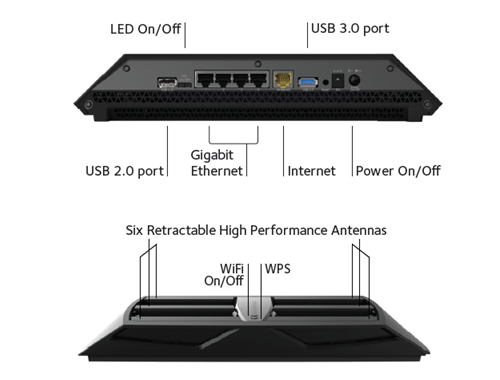
The R8000 is a beast of a router. Sporting looks like a geeky Lamborghini Diablo with antennae, nobody is going to mistake this for any other product. It's about a foot wide and 9 inches deep. So yeah, it's got a presence.
Whoa, what's this? 2 antennas not enough for you? How about 4? Still not enough? Well, here's no less than SIX antennas sprouting from this monster. The entire top of the case is a giant vent, presumably for the heat it could potentially generate, although I've never noticed any significant temperature increases -- but it does serve as a nice peek into the internals.
The LED panel is impressive. These lights shine a nice clear white, a refreshing change from the standard blue, and are quite bright.
The back panel shows a USB 2.0 port, a USB 3.0 port (nice!) and the standard Ethernet ports that ever router needs to be a router. Plus, there's a Wi-Fi power-off button and LED on/off control on the router.
Beamforming+—Smart, signal-focusing technology boosts the speed,reliability, and range of your WiFi connections
Key Features
AC3200 Tri-Band WiFi
WiFi Band 1: 600 Mbps @2.4GHz-256QAM
WiFi Band 2: 1300 Mbps @5GHz
WiFi Band 3: 1300 Mbps @5GHz
Smart Connect intelligently selects the fastest WiFi for every device
High powered amplifiers and six (6) high performance external antennas
Implicit & Explicit Beamforming for 2.4 & 5GHz
Powerful Dual-Core 1GHz processor with 3 offload processors
Memory: 128 MB Flash and 256 MB RAM
Two (2) USB ports: (1) USB 3.0 & (1) USB 2.0 port
Security
Customized free URL to set up personal FTP server
VPN support—secure remote access
Guest network access—separate & secure
WiFi Protected Access® (WPA/WPA2—PSK)
Double firewall protection (SPI and NAT)
Denial-of-service (DoS) attack prevention
Processor
1GHz dual core porcessor with three offload processors
Memory
128 MB Flash and 256 MB RAM
Physical Specifications
Dimensions: 11.63 x 8.92 x 2.14 in (295.5 x 226.8 x 54.5 mm)
Weight: 2.43 lbs (1.1 kg)
Standards
Two (2) USB ports: 1 USB 3.0 & 1 USB 2.0 port
IEEE® 802.11 b/g/n 2.4GHz-256QAM support
IEEE® 802.11 a/n/ac 5.0 GHz
Five (5) 10/100/1000 (1 WAN and 4 LAN) Gigabit Ethernet ports
Some impressive features and specs, indeed. What makes the R8000 stand out from other options, though? Find out on page 2.
What Makes the Nighthawk X6 So Different
Besides the fact that this router is packed full of basically every router feature NETGEAR offers, there are some unique aspects to it that make it special.
Tri-Band WiFi: This router has three wireless bands: one for 2.4 GHz, and TWO for 5 GHz.
High powered amplifiers and 6 antennas
USB 3.0, which many routers don't offer
Dual=Core 1 GHz processor; a TON of power for a router, and more than many smartphones, in fact
Beamforming, which optimizes performance of wireless devices based on their relative location to the router
Smart Connect, which separates your 5 GHz devices between the two 5 Ghz bands to further optimize performance
What's it like to own a NETGEAR R8000 Nighthawk?
In a word: great. For purposes of writing this review, I have left the R8000 with the stock NETGEAR firmware, although a DD-WRT firmware is also available currently.
This router is rock solid stable with the latest firmware updates. It has not gone down, dropped wireless connections, or otherwise had so much as a hiccup for weeks now. With the exception, of course, of a recent power outage, it has not had to be rebooted.
In my home, we have quite a few devices, and all can connect simultaneously with no noticeable degradation in performance (2 smartphones, 3 tablets, 2 laptops, a high powered desktop, an Ouya, a PS Vita, a Nintendo 3DS, PlayStation 3, XBOX 360, Kindle, etc.)
Logging into the router and navigating the firmware is expectedly snappy, given the processing power of the internal chip. There are no standout changes to the interface from the R7000 or other NETGEAR routers I've used recently, but this is OK by me -- it works.
Pros and Cons
There's a lot to love about the R8000, but I think it's worth noting some downsides first.
The recent firmware updates are a must. When I first set up the router, I did experience some wireless connection issues. With the latest updates, these vanished completely and it works like a dream.
The size. It's damn big. This might be a con for some people. With the 6 antennas fully deployed it looks like it's about to take off and jet around your living room. I dig this, but then again, I'm a huge nerd.
The price. You will pay to have the best. This is by no means a cheap router, but for larger homes and for those who demand the fastest performance, it's worth it.
Ultimate performance. I've seen better performance from this router than any other router I've used, from NETGEAR or otherwise. Today, while connected to a VPN out of my state, I'm seeing 42 Mbps... on wireless. That's insane. Without the VPN, I can max out my ISP's speeds at 60 Mbps, again on 5 GHz wireless. This is equivalent to the speeds I achieve on Ethernet! Plus, it handles a large number of devices connected at the same time with ease, making it perfect for large (or techincally minded) homes.
Features. You won't ever use all the features it has, most likely. You want it, the R8000 has it: parental controls, beamforming, VPN support, FTP support, supreme power, the list goes on.
Upgradeable: DD-WRT has already been released, with a variety of versions sure to come soon.
One final con I forgot to mention, but is actually the most important to me. The R8000, like other NETGEAR routers, does not have built in PPTP or OpenVPN support. This means that, without changing to DD-WRT, I am left with using my desktop or mobile clients for my personal VPN. I hope that in the future, NETGEAR finds a way to support popular VPN protocols built-in to their routers -- this is router firmware done right!
Conclusions
The R8000 is an excellent router, not without its cons, but the best router I have ever owned or used.
Is it right for you? Well, it depends. If you're not the super-technical type or have simple networking needs, then probably not -- it's pricey, and way more than you need. If your home Internet speed is limited, you likely won't see much benefit from the R8000's features, unless you depend heavily on network streaming.
However, if you have a medium to large sized home, with lots of devices, and plenty of Internet speed, the R8000 will almost definitely be a worthy addition (or upgrade) to your home network.
I've been a long time fan of NETGEAR routers, and with the R8000, they've really upped their game. There's a lot of hype about this particular router; many tout it as one of the best, if not the best on the market... and it certainly looks the part. However, with use by an average household, is it really worth it? Does it measure up?
Unboxing the NETGEAR R8000
I won't bore you with too many details here -- unboxings are cliche, no? I do really dig them, though, so here's some pics of what it's like to open one up. The packaging is top notch and very blingy, and this router really has a distinctive look.
Gold, shiny packaging.
The router of the hour.
Anatomy of the NETGEAR R8000
The R8000 is a beast of a router. Sporting looks like a geeky Lamborghini Diablo with antennae, nobody is going to mistake this for any other product. It's about a foot wide and 9 inches deep. So yeah, it's got a presence.
Whoa, what's this? 2 antennas not enough for you? How about 4? Still not enough? Well, here's no less than SIX antennas sprouting from this monster. The entire top of the case is a giant vent, presumably for the heat it could potentially generate, although I've never noticed any significant temperature increases -- but it does serve as a nice peek into the internals.
The LED panel is impressive. These lights shine a nice clear white, a refreshing change from the standard blue, and are quite bright.
The back panel shows a USB 2.0 port, a USB 3.0 port (nice!) and the standard Ethernet ports that ever router needs to be a router. Plus, there's a Wi-Fi power-off button and LED on/off control on the router.
Beamforming+—Smart, signal-focusing technology boosts the speed,reliability, and range of your WiFi connections
Key Features
AC3200 Tri-Band WiFi
WiFi Band 1: 600 Mbps @2.4GHz-256QAM
WiFi Band 2: 1300 Mbps @5GHz
WiFi Band 3: 1300 Mbps @5GHz
Smart Connect intelligently selects the fastest WiFi for every device
High powered amplifiers and six (6) high performance external antennas
Implicit & Explicit Beamforming for 2.4 & 5GHz
Powerful Dual-Core 1GHz processor with 3 offload processors
Memory: 128 MB Flash and 256 MB RAM
Two (2) USB ports: (1) USB 3.0 & (1) USB 2.0 port
Security
Customized free URL to set up personal FTP server
VPN support—secure remote access
Guest network access—separate & secure
WiFi Protected Access® (WPA/WPA2—PSK)
Double firewall protection (SPI and NAT)
Denial-of-service (DoS) attack prevention
Processor
1GHz dual core porcessor with three offload processors
Memory
128 MB Flash and 256 MB RAM
Physical Specifications
Dimensions: 11.63 x 8.92 x 2.14 in (295.5 x 226.8 x 54.5 mm)
Weight: 2.43 lbs (1.1 kg)
Standards
Two (2) USB ports: 1 USB 3.0 & 1 USB 2.0 port
IEEE® 802.11 b/g/n 2.4GHz-256QAM support
IEEE® 802.11 a/n/ac 5.0 GHz
Five (5) 10/100/1000 (1 WAN and 4 LAN) Gigabit Ethernet ports
Some impressive features and specs, indeed. What makes the R8000 stand out from other options, though? Find out on page 2.
What Makes the Nighthawk X6 So Different
Besides the fact that this router is packed full of basically every router feature NETGEAR offers, there are some unique aspects to it that make it special.
Tri-Band WiFi: This router has three wireless bands: one for 2.4 GHz, and TWO for 5 GHz.
High powered amplifiers and 6 antennas
USB 3.0, which many routers don't offer
Dual=Core 1 GHz processor; a TON of power for a router, and more than many smartphones, in fact
Beamforming, which optimizes performance of wireless devices based on their relative location to the router
Smart Connect, which separates your 5 GHz devices between the two 5 Ghz bands to further optimize performance
What's it like to own a NETGEAR R8000 Nighthawk?
In a word: great. For purposes of writing this review, I have left the R8000 with the stock NETGEAR firmware, although a DD-WRT firmware is also available currently.
This router is rock solid stable with the latest firmware updates. It has not gone down, dropped wireless connections, or otherwise had so much as a hiccup for weeks now. With the exception, of course, of a recent power outage, it has not had to be rebooted.
In my home, we have quite a few devices, and all can connect simultaneously with no noticeable degradation in performance (2 smartphones, 3 tablets, 2 laptops, a high powered desktop, an Ouya, a PS Vita, a Nintendo 3DS, PlayStation 3, XBOX 360, Kindle, etc.)
Logging into the router and navigating the firmware is expectedly snappy, given the processing power of the internal chip. There are no standout changes to the interface from the R7000 or other NETGEAR routers I've used recently, but this is OK by me -- it works.
Pros and Cons
There's a lot to love about the R8000, but I think it's worth noting some downsides first.
The recent firmware updates are a must. When I first set up the router, I did experience some wireless connection issues. With the latest updates, these vanished completely and it works like a dream.
The size. It's damn big. This might be a con for some people. With the 6 antennas fully deployed it looks like it's about to take off and jet around your living room. I dig this, but then again, I'm a huge nerd.
The price. You will pay to have the best. This is by no means a cheap router, but for larger homes and for those who demand the fastest performance, it's worth it.
Ultimate performance. I've seen better performance from this router than any other router I've used, from NETGEAR or otherwise. Today, while connected to a VPN out of my state, I'm seeing 42 Mbps... on wireless. That's insane. Without the VPN, I can max out my ISP's speeds at 60 Mbps, again on 5 GHz wireless. This is equivalent to the speeds I achieve on Ethernet! Plus, it handles a large number of devices connected at the same time with ease, making it perfect for large (or techincally minded) homes.
Features. You won't ever use all the features it has, most likely. You want it, the R8000 has it: parental controls, beamforming, VPN support, FTP support, supreme power, the list goes on.
Upgradeable: DD-WRT has already been released, with a variety of versions sure to come soon.
One final con I forgot to mention, but is actually the most important to me. The R8000, like other NETGEAR routers, does not have built in PPTP or OpenVPN support. This means that, without changing to DD-WRT, I am left with using my desktop or mobile clients for my personal VPN. I hope that in the future, NETGEAR finds a way to support popular VPN protocols built-in to their routers -- this is router firmware done right!
Conclusions
The
R8000 is an excellent router, not without its cons, but the best router I have ever owned or used.
Is it right for you? Well, it depends. If you're not the super-technical type or have simple networking needs, then probably not -- it's pricey, and way more than you need. If your home Internet speed is limited, you likely won't see much benefit from the R8000's features, unless you depend heavily on network streaming.
However, if you have a medium to large sized home, with lots of devices, and plenty of Internet speed, the R8000 will almost definitely be a worthy addition (or upgrade) to your home network.
This article describes the steps required for firmware upgrade in Netgear R7500. Flashing Open-WRT Firmware from Stock Firmware: Here I use OEM firmware downloaded from the NETGEAR support site and OPEN-WRT firmware downloaded from here.
Step1:
Log in to the router web interface i.e. 192.168.1.1 and navigate to the Advanced -> Administration ->Backup Settings as shown in figure 1.
Figure 1
Step2:
Click the “Erase” button under “Revert to factory default settings” section as shown in figure 2.
Figure 2
Step 3:
Click the “Yes” button as shown in figure 3.
Figure 3
The router will reboot and you will be able to see a page same as figure 4. Wait for the reboot process to complete.
Figure 4
Step 4:
Log in to the router web interface i.e. 192.168.1.1 and navigate to the Advanced ->Administration->Router Update as shown in figure 5.
Figure 5
Step 5:
Click “Browse”, select the path for the Open-WRT firmware that you downloaded and click on the “Upload” button as shown in the figure 6.
Figure 6
Step 6:
Then click on the “OK” button as shown in figure 7.
Figure 7
Step 7:
Then click on the “Yes” button as shown in figure 8.
Figure 8
The router will reboot and you will be able to see a page same as figure 9. Wait for the reboot process to complete.
Figure 9
Step 8:
It is always recommended to reset the router to factory defaults after successful firmware upgrade. This can be done by pressing the reset button for say 30secs. You will need to use something pointed to press the reset button, I use a pen for the same.
Step 9:
Now, you will be able to log on to the Open-WRT web page by typing 192.168.1.1 in your browser as shown in figure 10.
Figure 10
Step 10:
Click on “Login” button as shown in figure 11. It is recommended to clear the cache of your web browser before using it.
Figure 11
Step 11:
Then you can see the status page of your router and the firmware version as shown in figure 12.
Figure 12
Flashing Stock Firmware from Open-WRT Firmware
Here I use OPEN-WRT Firmware downloaded from here and OEM Firmware downloaded from here.
[OEM firmware provided in above link is in ".bin" format. It is an intermediate firmware. It is recommended that from this OEM firmware users should upgrade to the latest OEM firmware available in NETGEAR support site.]
Step1:
Log in to the router web interface i.e. 192.168.1.1 and navigate to System -> Backup / Flash Firmware -> “Browse” under “Flash new firmware image”. Select the path for the Stock firmware (with .bin extension) that you downloaded from myopenrouter.com and click on the “Flash image” button as shown in the figure 13.
Figure 13
Step 2:
Then click on the “Proceed” button as shown in figure 14. Wait for the reboot process to complete as shown in figure 15.
Figure 14
After you click on the proceed button you will see a page as in figure 3
Figure 15
Step 3:
It is always recommended to reset the router to factory defaults after successful firmware upgrade. This can be done by pressing the reset button for say 30secs. You will need to use something pointed to press the reset button, I use a pen for the same.
Step 4:
After reboot is complete Log in to the router web interface i.e. 192.168.1.1. Enter the username and password for the same. (Default username = admin and password = password for Netgear Stock Firmwares) and then click on the “Ok” button. It is recommended to clear the cache of your web browser before using it.
The NETGEAR R7000, the first "Nighthawk" router on the block, made headlines at its introduction as one of the fastest -- if not THE fastest -- consumer routers on the market. It's maintained its popularity since then, especially with open source fanatics, and for good reason.
However, what about those of us who aren't interested in dabbling in
open source? NETGEAR hasn't left those users behind, and has stuck to
their promise of continuing to improve their products with the latest
firmware update to the R7000, which was launched in late April 2015.
What's new in the latest R7000 update
For starters, the latest update contains a number of fixes and enhancements that work behind the scenes to ensure the router runs as efficiently and as stable as it can. In addition, NETGEAR has rolled out three exciting new features.
First, ReadyCLOUD/ReadySHARE integration for USB connected drives
Most technology-connected people these days are aware of the cloud based services that now surround us -- they're everywhere, and NETGEAR has their own. However, ReadyCLOUD is very different from mainstream cloud file sharing services in that you are housing the data locally and sharing it remotely directly from your router… for no extra cost.
Setting up ReadyCLOUD is easy! All you have to do is sign up for a cloud based account on the ReadyCLOUD site and link this to your router in the setup screen. We'll cover the ReadySHARE setup and features in a more detailed review, soon to come!
Second, easy remote access from NETGEAR Genie
There may be times when you are away from home and need to manage settings on your router, such as adjusting parental controls or changing Wi-Fi settings. What if you're on a business trip and your husband forgot the Wi-Fi password, or your kids need special access to a certain website and your wife isn't familiar with how to adjust the settings? Maybe you want to play a prank on your dorm mates and lock them out of the network, not that you'd ever do anything like that.
Well, by golly, with NETGEAR Genie and the R7000, now you can! Apps are available for iOS, Android, and desktop.
Third, simple upgrade and setup process for cable gateways
Many folks are getting, in NETGEAR's terms, "hamstrung" by their ISP's equipment. Did Comcast stick you with a basic router/modem that isn't giving you the performance you crave?
The R7000, with this latest upgrade, now makes it super easy to use it as an access point in addition to your existing router/modem, so you don't have to get rid of anything but can take advantage of all the R7000's features… and 802.11ac Wi-Fi!
You can find more information on NETGEAR's Knowledge Base, but trust us, this is very easy to use.
Conclusions
All in all, these new features add some interesting and useful functionality to a router that the market has already come to know and love, and is yet another reason to consider NETGEAR for your advanced networking needs.
NETGEAR IS A TRIPLE WINNER IN RED DOT AWARD 2015 COMPETITION FOR PRODUCT DESIGN QUALITY
(press release)
Arlo Smart Home HD Security Camera, ProSAFE Click Switch, and AirCard 340U USB Modem are tops in global high design
SAN JOSE, Calif. — April 21, 2015— NETGEAR®, Inc. (NASDAQ: NTGR) (www.netgear.com), a global networking company that delivers innovative products to consumers, businesses and service providers, is a remarkable triple laureate in one of the world’s most prestigious design competitions. The NETGEARArlo™ Smart Home HD Security Camera, the NETGEAR ProSAFE® Click Switch, and the AirCard® 340U USB Modem won over the 38-member jury of the Red Dot Award: Product Design 2015 (www.red-dot.org/press). With these three stylish networking solutions for the smart home, NETGEAR has proved its design excellence in this important competition for product design, currently celebrating its 60th anniversary this year.
Throughout the world and across different industries, Red Dot is seen as the award for high design quality. The international Red Dot jury bestows the sought-after seal of quality only to those products that stand out clearly from comparable entries thanks to their excellent design. This year, the international experts assessed 4,928 entries from 56 countries, with the three NETGEAR products deservedly winning accolades.
“Winning three Red Dot Awards is an amazing recognition of the effort we put into making NETGEAR products not only innovative in their engineering design, but in their physical form as well,” said John Ramones, NETGEAR senior director of product design. “We invest in making technologically sophisticated devices that are also affordably elegant. Our reward is that you’re proud to display our products in homes as well as businesses.”
Professor Dr. Peter Zec, founder and CEO of the Red Dot Award, said, “For 60 years, the most-respected design experts have been convening every year in Essen, Germany, to seek out the best designs. This year we had a record number of almost 5,000 entries – a huge amount of work for our jury members, who assessed each individual product, and a special value of the distinction due to the high standard. The laureates of the Red Dot Award: Product Design 2015 have demonstrated exceptionally high achievements and have thus been deservedly successful in the world’s largest design competition.”
The internationally respected product competition will culminate in the Red Dot Gala in Essen on 29 June 2015. The glamorous award ceremony with more than 1,200 guests will be hosted by Professor Dr Peter Zec in Essen’s Aalto Theater. At the subsequent Designers’ Night after-show party, the winners celebrate into the early hours in the midst of award-winning products in the Red Dot Design Museum Essen. The winning products are then presented for four weeks in the special exhibition “Design on Stage” before being included in the museum’s permanent exhibition.
The three NETGEAR design winners are:
1. The NETGEAR Arlo™ Smart Home HD Security Camera (www.Arlo.com) is the first 100 percent wire-free WiFi security camera with crystal-clear, high definition video. You can monitor your home from every possible angle, inside or out, with these outdoor-ready cameras that are equipped with night vision to give you HD video around the clock. The combination of easy installation, battery-operated true wireless design, weatherproof construction, and a clean, compact form factor enables you to set up a camera wherever you want, easily and discreetly, without worrying about finding a power outlet or the hassle of inconvenient power cords. Arlo alerts you instantly if an event occurs, and you can add up to 15 cameras to a system and watch as many as 4 simultaneous camera streams from your desktop, notebook computer or favorite mobile device. The NETGEAR Arlo Smart Home Security Kit with two cameras (VMS3230) is available at an MSRP of $349.99 in the U.S., with a three-camera kit (VMS3330) for $449.99 and a four-camera kit (VMS3430) for $499.99. Add-on cameras (VMC3030) are sold separately from $159.99 each. NETGEAR teamed with Oakland, Calif.-based Enlisted Design (www.enlisteddesign.com) on Arlo.
2. The NETGEAR ProSAFE® Click Switch (www.netgear.com/clickswitch), with an industry-first bracket mounting system for easy and attractive installation, is designed to improve cable management and reduce unsightly cords in connected homes and growing businesses. Available in either 8- or 16-Gigabit port configurations, its slim design and internal power supply enable you to organize wires, secure cables, eliminate bulky power adapters, and improve the overall appearance of home theaters, home offices, cubicles, wiring closets, training facilities, lab benches, or conference rooms. The unique 1-2-3-4 click mounting system and switch bracket with both vertical and horizontal orientations enable optimal placement and cable management in locations where other switches will not go. The MSRP in the U.S. for the ProSAFE 8-port Gigabit Click Switch (GSS108E) is $69.99, while the 16-port version (GSS116E) is $169.99. The Click Switch is also a result of the NETGEAR association with Enlisted Design.
3. The NETGEAR AirCard 340U USB Modem (www.netgear.com/home/products/mobile-broadband/usb-modems/340U.aspx) is an ultra-slim hinged USB wireless modem designed for 4G/LTE networks, offering a premium user experience of superfast download speeds & high quality connection. It is the first USB Modem to have an LCD interface allowing the user to easily view data usage information, network, and signal strength at a glance. The AirCard 340U features a robust dual axis articulating hinge, which ensures the user has the flexibility to find the right connection solution for his or her computer without sacrificing usability or comfort. Offering download speeds of up to 100 Mbps* and upload speeds up to 50 Mbps along with global roaming in more than 200 countries, the softly sculptured compact and full featured AirCard 340U keeps you connected whether you are working in the office, at a coffee shop, or on the road almost anywhere around the world. The NETGEAR AirCard 340U USB Modem is available through select service providers in North America. Prices vary. James Hathaway of NETGEAR UK designed the AirCard 340U in conjunction with UK firm The Alloy (www.thealloy.com).
About the Red Dot Award
In order to appraise the diversity in the field of design in a professional manner, the Red Dot Design Award breaks down into the three disciplines of Red Dot Award: Product Design, Red Dot Award: Communication Design and Red Dot Award: Design Concept.
The Red Dot Award was created by Design Zentrum Nordrhein Westfalen and with around 17,000 entries each year is one of the best-respected design competitions in the world. In 2015, it is celebrating its 60th anniversary: It was in 1955 that a jury convened for the first time to assess the best designs of the day. The sought-after award, the “Red Dot”, is the revered international seal of outstanding design quality.
Award-winning designers, manufacturers and agencies use the Red Dot winner label and receive numerous other winners’ privileges, such as the presentation of the award-winning product on Red Dot Online, in the Red Dot Design Yearbook, the Red Dot App and on Red Dot 21. Additionally, the winning products are communicated in the international PR activities of Red Dot and exhibited in the Red Dot Design Museum Essen for a whole year.
With roughly 2,000 exhibits over 4,000 square metres, the Red Dot Design Museum presents the world’s largest exhibition of contemporary design. The successful entries in the Red Dot Award: Product Design 2015 will be shown from 29 June to 26 July 2015 in an impressive special exhibition in the midst of the historical industrial architecture of the Zollverein World Heritage site. In “Design on Stage”, visitors will experience the current top achievements up close and personal, because this hands-on exhibition expressly encourages visitors to touch and try out the exhibits. In this way, fans of design can find out about the trends in international product design and see for themselves the good quality of the winning NETGEAR products.
About NETGEAR, Inc.
NETGEAR (NASDAQ: NTGR) is a global networking company that delivers innovative products to consumers, businesses and service providers. The Company's products are built on a variety of proven technologies such as wireless, Ethernet and powerline, with a focus on reliability and ease-of-use. The product line consists of wired and wireless devices that enable networking, broadband access and network connectivity. These products are available in multiple configurations to address the needs of the end-users in each geographic region in which the Company's products are sold. NETGEAR products are sold in approximately 44,000 retail locations around the globe, and through approximately 36,000 value-added resellers. The company's headquarters are in San Jose, Calif., with additional offices in approximately 25 countries. More information is available at http://investor.netgear.com or by calling (408) 907-8000. Connect with NETGEAR at www.twitter.com/NETGEAR and www.facebook.com/NETGEAR.
* Maximum wireless signal rate derived from IEEE standard 802.11 specifications. Actual data throughput and wireless coverage will vary. Network conditions and environmental factors, including volume of network traffic, building materials and construction, and network overhead, lower actual data throughput rate and wireless coverage. NETGEAR makes no express or implied representations or warranties about this product’s compatibility with any future standards.
Safe Harbor Statement under the Private Securities Litigation Reform Act of 1995 for NETGEAR, Inc.: This press release contains forward-looking statements within the meaning of the U.S. Private Securities Litigation Reform Act of 1995. Specifically, statements concerning NETGEAR's business and the expected performance characteristics, specifications, reliability, market acceptance, market growth, specific uses, user feedback and market position of NETGEAR's products and technology are forward-looking statements within the meaning of the Safe Harbor. These statements are based on management's current expectations and are subject to certain risks and uncertainties, including, without limitation, the following: the actual price, performance and ease of use of NETGEAR's products may not meet the price, performance and ease of use requirements of customers; product performance may be adversely affected by real world operating conditions; failure of products may under certain circumstances cause permanent loss of end user data; new viruses or Internet threats may develop that challenge the effectiveness of security features in NETGEAR's products; the ability of NETGEAR to market and sell its products and technology; the impact and pricing of competing products; and the introduction of alternative technological solutions. Further information on potential risk factors that could affect NETGEAR and its business are detailed in the Company's periodic filings with the Securities and Exchange Commission. NETGEAR undertakes no obligation to release publicly any revisions to any forward-looking statements contained herein to reflect events or circumstances after the date hereof or to reflect the occurrence of unanticipated events.
In order to get the optimum performance in either 802.11n or g, you will need to configure the wireless mode and channel of your WNR3500L a certain way - depending on the mode your client (i.e., laptop, netbook, mobile phone, MID, PDA, etc.) Follow the instructions below to maximize the performance of your router, and don't forget to post if you have any questions!
Selection of Wireless Mode:
The selection of wireless mode on the AP side, i.e., on the router itself, depends on the wireless client being used. If the wireless client supports 802.11n mode, then you should select wireless mode as “Up to 300 Mbps." If your wireless client does not support 802.11n and it only supports 802.11g mode, then on WNR3500L you should select wireless mode as “Upto 54Mbps."
Selection of Channel:
You should select a channel for the WNR3500L AP that is different than that of other AP's in the near vicinity.
Fig 1: Setting wireless mode to 802.11g
Fig 2: Setting wireless mode to 802.11n
Given below is the summary of the method that I used to get optimum performance from WNR3500L and measure it.
NETGEAR WN111v2 is used as an iperf client and the iperf server is running at host connected to LAN interface of the WNR3500L through wired connection. As mentioned above I select wireless mode to “Upto 300Mbps” for 802.11n. To get optimum performance iperf the window size at both the server and the client should be kept at 256 Kbytes.
With this setting, 802.11n performance has been tabulated below:
In 802.11g mode, I select wireless mode to “Upto 54Mbps." With this setting, 802.11g performance has been tabulated below:
With the latest updates to the NETGEAR R7000"Nighthawk," a flurry of exciting new features and functionality was introduced -- not the least of which is ReadyCloud integration. I am personally a huge fan of ReadyCloud -- it recently saved the day for me, allowing me to access a PDF book for some tech studying that I had falied to copy from my ReadyNAS over to my Surface Pro 3 or my other cloud storage solutions. Now, that same flexibility is available for R7000 owners, so even if one doesn't have a NAS or other ReadyCloud enabled device, they now get this functionality! So, how does it work?
What the heck is NETGEAR ReadyCloud?
In short, ReadyCloud is a secure way to access your network devices from NETGEAR from anywhere you are that has access to an Internet connection and a browser. Traditionally, this has been included on storage devices such as the ReadyNAS, but has now found its way into the R7000 -- which, courtesy of its USB port, can integrate seamlessly.
ReadySHARE Cloud allows you to log in to an online portal, which then, through NETGEAR's software, opens a secure tunnel to your devices at home. You're presented with a familiar looking file and folder view, which can be used to read, view, download, and even share your files with others... without having to upload them to a third party service.
Ok, so how do I set up ReadyCloud on my NETGEAR router?
Thankfully, the folks at NETGEAR have made it really easy to set up ReadyCloud. The first step is to open a ReadyCloud account at the online portal.
Once this step is complete, ensure that your R7000 is updated to the latest version of the firmware, which includes ReadyCloud integration. The router should have prompted you manually to install the update, but you can do it manually if you wish. This can all be performed via the router's built-in GUI, which you can access at 192.168.1.1 from your browser.
After you ensure that you are on the latest update, go ahead and attach a formatted USB drive to the R7000. After the USB drive is attached, head to the "ReadySHARE" tab in the GUI, which is located in the Basic section. From there, select the ReadyCloud dropdown as shown.
You will be presented with a dialog prompting you to enter your ReadyCloud credentials. Use the credentials you selected when you registered through the web portal... and that's it. The magic begins happening right away.
Verifying ReadyCloud is Working on your R7000
Now, log back into the web portal and refresh your browser. You should now see a nice icon denoting that you have added an R7000 connected drive to your ReadyCloud access panel. You will also see any shares from NAS devices that you have attached to the service. This is especially cool if, like me, you have an R7000 and a ReadyNAS in your network.
When you double click on the R7000 icon, you will be brought to a panel displaying the files and folders available on the USB attached drive. From there, you can download a copy of the files you have on that drive as well as view them online.
Verify that you can download and view your files, and you're good to go.
Mobile Clients Compatible with ReadyCloud
You can use the web client portal as you have been, or you can alternately download the ReadyCloud apps that are available for iOS and Android devices. This opens up a wide array of additional features:
Streaming DLNA music from your ReadyCloud attached device to your mobile device (DLNA must be enabled on the shares for this to work)
Automatic Camera Roll backup to ReadyCloud
Of course, this is in addition to all the great features of ReadyCloud that you can access on the desktop.
Why would I use ReadyCloud?
This is the $10M dollar question, right? Why would I use this when I could use one of the many online services available? Cloud storage has its place, no doubt. While most cloud storage providers are very reputable and can be trusted to keep your data safe (your author uses several) ReadyCloud is unique in a couple of ways.
First, the DLNA streaming feature. For some folks, managing a music or media library in the cloud can be a mess, with thousands of files to upload, and sometimes hundreds of gigabytes to upload. For someone with a slow connection, this is simply not possible. ReadyCloud makes it possible, then, to access music stored on a NAS from wherever the user is, with no need to upload data to external servers.
Second, keeping your data safe. Again, most major cloud service providers do a decent job of this, with some even taking encryption and security several steps further than others. However, there might be some data you possess that you just aren't comfortable uploading anywhere at all. Family memories, confidential documents, that secret novel you're working on, who knows? You can access them in a safe and encrypted manner with ReadyCloud without having to upload them to another server to live forever and potentially get hacked or breached.
Third, ReadyCloud has no monthly or annual fees. Your data is your data, and you will have access to the full amount you have connected to your R7000 or ReadyNAS. NETGEAR is providing this service essentially for free, and that is something to be said.
Conclusions
ReadyCloud is one of those things that is so simple, yet so complicated. Making your local data accessible over the web in a secure and conveninent manner is no easy task, yet NETGEAR is offering it -- for free -- on several of their devices including this router. What makes ReadyCloud really special is the integration with your home network and mobile devices.
Personally, I think this feature alone, especially for ReadyNAS users, is enough to say that yes, the R7000 is the right router for you. Even without, it's hard to say "no" to a feature that works well and is essentially free for R7000 owners.
Are you using ReadyCloud? Let us know how it's working on the forums!
The world of open source never sleeps -- we've heard that a popular flavor of firmware for Asus routers has made its way over to the NETGEAR R7000"Nighthawk."
Asuswrt is the firmware developed by Asus for use on many of their routers, and was originally based on the Tomato firmware (which is very popular for NETGEAR routers also.) Asuswrt-Merlin, according to the official website, is a modified version of that firmware that aims to fix its problems and add enhancements while preserving the original performance.
Are you interested in trying XWRT/Asuswrt-Merlin on your NETGEAR R7000? This post on the Linksysinfo forums will show you how and direct you to the latest builds. From what we can tell, this is a very early work-in-progress, so flash at your own risk!
Supports HDD more than 3TB size which is in HFS+ file system.
Bug Fixes
Updated 2.4GHz and 5GHz wireless driver to fix the wireless connection unstable issue.
Fixed the issue where Dynamic QoS record disappears.
Fixed the issue where user can’t access ReadySHARE USB drive for password protected shares.
Fixed the issue where user can’t reserve an IP address outside the DHCP pool.
Fixed the security issue related to ReadySHARE Print function.
Fixed the issue where user can’t work with iTunes Server 12.1 version.
Fixed the issue where "Turn off wireless signal by schedule" is not working when the "Automatically adjust for daylight savings time" option is checked.
Known issues & bugs & Limitation
With regards to Apple's Time Machine backup function, Nighthawk X4 R7500 Router only supports NTFS, EXT4, EXT3, EXT2, HFS+ in Journal, HFS+ in non-journal file system. R7500 does not support FAT16, FAT32 file format for Apple Time machine backup at the moment.
R7500 support maximum backup file size up to 500GByte now for Apple Time Machine backup.
Let me begin by saying we have some great developers working on NETGEAR firmware releases. I've been using Kong's and shibby's DD-WRT and Tomato builds for years on various NETGEAR models, and all have been fantastic. The latest flavor I've been using has been Kong's DD-WRT build for the NETGEAR R8000 Nighthawk, and I wanted to share my experience with it over the past few months.
Installation
Kong's builds have a distinct advantage in that they are very easy to install, and this build for the R8000 is no exception. Simply restore your R8000 to factory settings, use the .CHK file included in the archive to update the router, then perform another factory reset. That's all you have to do to get DD-WRT up and running on your R8000 with this build!
Features
This build comes packed with all the extra goodies you'd expect from DD-WRT:
Advanced routing settings
IPv6
DDNS
USB
NAS
Hotspot
VPN
SIP
Privoxy
Lighttpd
VPN Passthrough
NAT/QoS
And more...
AC Specific Features
This build for the R8000 looks a little different than other builds, due to the three radios in the R8000 and the AC band. Users can customize each of the three bands and even enable/disable implicit and explicit beamforming,
VPN Support
One of the most important features to me in any open firmware build is the ability to use a personal VPN service such as PrivateInternetAccess. The DD-WRT Kong Mod build for the R8000 does equally as good of a job as shibby's Tomato builds. I've encountered some firmware builds in the past that have had issues with VPN providers, namely with retaining a connection (this is well documented in our forums) but I am happy to say that this build has none of those problems. With proper setup, I'm enjoying a consistent VPN connection at all times, unless the rare instance of the VPN servers themsleves going down takes place.
Speeds
This is all anecdotal, of course, but I'm seeing incredible speeds from this router. My wired speeds are roughly the same as NETGEAR stock firmware or other open firmware builds, but the biggest difference is the speed when OpenVPN is enabled. I'm seeing speeds -- on 5 GHz wireless -- of over 30 Mbps (on a 60 Mbps connection). This is almost double what I have seen with other routers when running OpenVPN, such as the WNR3500L for example.
Overall
Given the potent mix of stability, reliability, features, and VPN support, I give this firmware build a solid two thumbs up, and a must try for any R8000 owner looking to come over to the open source side of things!
Are you a fan of the NETGEAR Nighthawk series of routers? If so, you definitely need to snag these awesome wallpapers for your tablet, desktop, or laptop.
These backgrounds are in full 1920x1080 HD resolution, and represent the Nighthawk, Nighthawk X4, and Nighthawk X6!


 here's never been WiFi like it. The Nighthawk X6 AC3200 Router with breakthrough Tri-Band WiFi technology was built to connect to each and every device in your home??automatically and simultaneously.